When the company migrated from WSS 3.0 to MOSS 2007 and then from MOSS 2007 to SharePoint 2010, we received a lot of requests from our customers to put a script that would redirect site visitors and users to the new site, if a new one had been created. And this is what this post is about.
Note: This solutions calls for the use of a Content Editor Web Part. As I have stated in previous posts, I am not too happy with the way SharePoint 2010 might change the code I put on Content Editor Web Parts. To prevent SharePoint from changing my code, I usually upload a TXT file to a document library on the site and I reference the file from the Content Editor Web Part.
1. Edit the page where you would like to include the redirect script
2. Add a Content Editor Web Part on the page
3. Edit the Content Editor Web Part properties, remove chrome, rename the web part to something more meaningful than 'Content Editor' (such as, Redirect), and make any other changes as applicable to your own situation
4. Select the Content Editor Web Part Click here to add new content link
5. Locate the HTML icon within the Markup section of the ribbon, select it, and then select Edit HTML Source
6. Type in (or copy and paste) the code below in the HTML Source web page dialog that displays
<script '"text/javascript"'>//<![CDATA[alert("This site has been moved to another location. Please update all existing bookmarks. You will be redirected momentarily.");//]]></script>
<meta http-equiv="refresh" content="10;url=https://www.sharepointbinder.com">
7. Select [OK] and save the page.
The script above is set up to redirect after 10 seconds. Modified this setting to your own needs.
Remember to also replace the URL above with the appropriate destination URL that applies to your particular situation.
Tip: If you would like to hide the Quick Launch (or left navigation pane) for all the pages on a given site, you can insert the code below within the header (<head>) of your custom master page using SharePoint Designer.
The easier way to do this would be to insert a Content Editor Web Part anywhere on the page for which you would like to hide the Quick Launch and insert the code in the HTML Source section of the web part. However, once in a while I face a couple of things with the Content Editor Web Part since we upgraded to SharePoint 2010. And that is that it many times adds blank lines, creating empty, blank spaces on my pages, or it changes my HTML code once I save the web part or page. So I prefer to put the code on a text file (you can use your computer's notepad and that should suffice) that I then upload to some document library on the site. Then I use the Content Editor Web Part to reference the file where I have saved the code. In this way I can prevent both SharePoint from "compiling" and changing my code to whatever, and I avoid the bug that adds blank lines to my pages where the Content Editor Web Part displays. But this is my preference. You can do whatever feels better, easier, or more comfortable for you.
The code you need is, as follows,
<style type="text/css">
#s4-left-panel
{
display:none;
}
.s4-ca
{
margin-left:0px;
}
</style>
Use the solution below if you are asked to provide a column in a SharePoint custom list that displays the day of the week based on another column that contains an actual date.
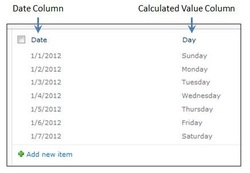 In the example to the left, the first column (Date) displays a date in the M/D/YYYY format, while the second column (Day) displays the day of the week for the date to the left.
The column to the left consists of a Calculated column.
The formula needed to translate the information in the Date column is:
=TEXT(WEEKDAY([Date]),"dddd")
Just replace Date with the (internal) name for the column applicable to your own list.
Use dddd to display the full name of the week (for example, 'Sunday').
Use ddd to display the abbreviated name of the week (for example, 'Sun').
For some reason that Microsoft probably only knows, you cannot create lookup columns to Choice columns within other custom lists. Lookups seem to only work on Single Line of Text type of columns, which doesn't make much sense to me. However, there is a work-around using Calculated values.
I discovered this once when I was trying to add a lookup column pointing to a very extensive list of countries, and a few other things, such as regions, divisions, etc.
The purpose of using Choice columns is for most part to force the user to make selections from a predefined list, so as to avoid duplicate values or mispellings.
Why would Microsoft not allow pointing lookup columns to choice columns is beyond me. But well, let's dive in the work-around I found. By the way, this works for both MOSS 2007 and SharePoint 2010.
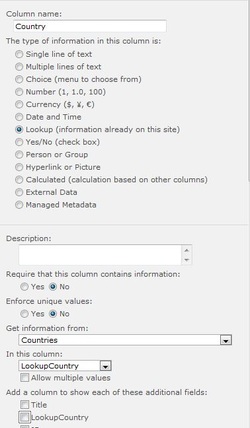
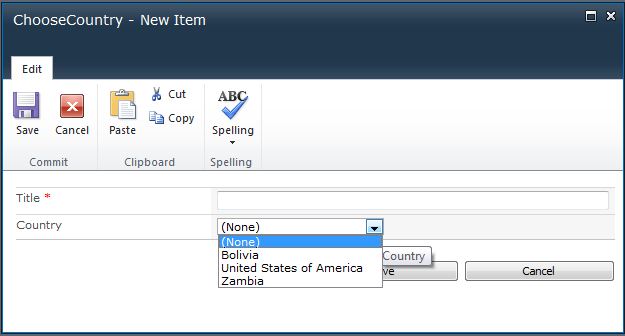
So the first thing we need to do is create a custom list where to host the Choice column.
 As you can see in the example image to the left, I've created the Country column as a Choice column.
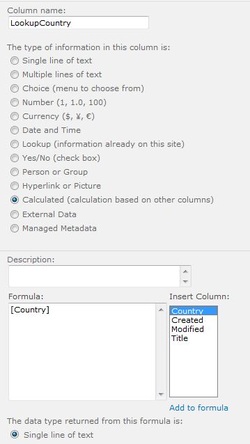 The next step is to create the column that will actually be used for the lookup. I'm going to call this column LookupCountry.
I'm going to designate is a Calculated value column. And then I'm going to insert the Country column.
The next thing you need to do is determine the data type that will be returned from the column. For my example, I'm good using Single line of text; therefore, I won't change the default value suggested by SharePoint.
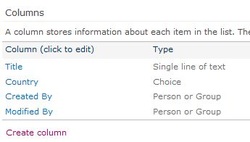
So now we need to go to the second list, from where we want to reference the list of countries.
Create a new column on this second list and select Lookup as the type of information.
Make any additional selections you may need (such as whether to require that this column must contain information).
Select your first custom list, the one where you created the calculated value column at the Get information from drop-down list.
And then select the Calculated value column from the list (where it says In this column).
Save everything and voilá! Once some values are input in the first list, the lookup drop-down on the second list should display some values.
Sometimes Microsoft’s CSS still gets in the way of your own code, either not allowing you to make some changes to colours, or ignoring your colour settings completely. Well, I have yet to fix it for the colouring problem. However, I was facing a similar situation where my links were being displayed too way apart (like a good 14 pixels in between them) when I had set it up to have only like 4 pixels in between each (padding-bottom: 4px). So when trying to find out where the code was coming from, I discovered that Microsoft was using not just the corev4.css but also a few other CSS files. One of these files, the one that was overriding my CSS settings was called ‘controls.css.’ (Note: SharePoint uses even other ones other than control.css; that was the one that was messing up my one site; your case could be different.)
I remembered that in MOSS 2007 we had more than one external CSS files being referenced by the selected master page for the site. In that version of SharePoint, depending on which master page we would select, the number of external CSS files would vary. If you have already been modifying any master page in SharePoint 2010, you already know that it does not come with any external CSS registration inside the <head> tag of the master page. You have to manually insert it. I’m talking about the following line of code for a v4.master page in this case:
<SharePoint:CssRegistration Name="<% $SPUrl:~sitecollection/Style Library/YourCoreFileNameHere.css %>" After="corev4.css" runat="server"/>
That way, you can tell the system to first pull the corev4.css and then yours. But still, Microsoft and SharePoint have a mind of their own and sometimes yet another CSS code or file overrides yours. So I wondered if we could declare more than one external CSS files like we used to do in MOSS 2007 so as to override any other ones that could be overriding ours. And after trial and error, I can say that the answer is yes.
But there is a trick to it: You have to follow a specific order. In MOSS 2007 that order was alphabetical. In SharePoint 2010 is ‘linear.’ (I don’t know which other way to call it.) While working on one of my company's portals I discovered that in that particular case it was not only using the Corev4.css, but I also discovered that under certain circumstances, it was pulling the control.css file. So I had to declared my external CSS files in the order of priority, with the most important one being declared at the top and the least important one at the bottom. For that particular project, I only had two files. And this is how I declared them:
<SharePoint:CssRegistration Name="<% $SPUrl:~sitecollection/Style Library/en-us/Themable/Core Styles/PROJACRONYMcontrols.css %>" After="PROJACRONYMCore.css" runat="server"/>
<SharePoint:CssRegistration Name="<% $SPUrl:~sitecollection/Style Library/PROJACRONYMCore.css %>" After="corev4.css" runat="server"/>
By declaring them in this order, I’m telling SharePoint that I first want it to run its own corev4.css, followed, by PROJACRONYMCore.css, which is followed by PROJACRONYMcontrols.css. This way, I have guarantee that my CSS files are going to pull in the priority I want them to and not the way SharePoint feels like it. It is very important that you pay attention to the order; otherwise, it will not work.
Oh, one more thing. If you have no idea which CSS file Microsoft SharePoint could be using and referencing, use any developer's tools you may have access to. If you are using Microsoft's Internet Explorer, press <F12> on your keyboard. This will open the Developer Tools window. Point to the location on the page where the code is not doing what you want it to do and you will see a blue rectangle appearing on the screen (if you are using IE). Then click and you will see a list of CSS files (in the right frame of the Developer Tools window). The one at the bottom is the one that is overriding yours. Click the link (its name) and it will display the code and you will also know the exact location for the file. Then go to SharePoint Designer, make a copy of that CSS file, (never work on the original files, please), rename it, and then modify the setting that is not doing what you want it to do. Check it in and publish it. Finally, go back to your master page and register the new file along with your other ones and in the order I shared above. Publish your master page and verify in the browser if it’s now displaying things the way you want it to.
To register and reference your external CSS file on a custom SharePoint 2010 master page, insert the following line inside the <head> tag of your custom master page. <SharePoint:CssRegistration Name="<% $SPUrl:~sitecollection/Style Library/ YourCoreFileNameHere.css %>" After="corev4.css" runat="server"/> To register more than one CSS external file, check this other post.
Note: I always recommend making copies of Microsoft files and pages and not to work on them directly. For what I described above, I usually make a copy of the v4.master master page and I also make my own copy of the corev4.css file, leaving both the original v4.master and corev4.css files alone.
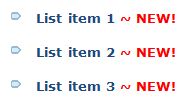
This solution allows adding a 'New!' flag to list items via the use of a special column in a custom list, as well as one line of XSL code.
| |
The first thing I do is I create a Yes/No column in my list (you can also create this column as a Site Column if you think you're going to be using it in more than one list or library). For the example, we're going to call this column 'NewYN.'
(If you prefer, you can use a Choice column with two menu options, 'Yes' and 'No,' instead.)
Then in my custom Style Sheet, I add the following code:
<xsl:if test="(@NewYN = 'True')">
<font size="1" color="#FF0000" ><xsl:value-of select="' ~ NEW!'"/></font>
</xsl:if>
In my example, I'm using the colour red (FF0000). You can change this colour to any colour of your choice. (For an article about Web Color Reference, click here.) The last step woudl be to modify the Content Query Web Part as appropriate so it can read your style sheets.
Follow the steps below if you are having problems with a web part on a web part page and you can't delete the web part in the usual way, which would be selecting Delete at the web part's edit menu.
- Go to the appropriate page
- Append ?contents=1 in the URL right after .aspx
- Press <Enter>
- SharePoint displays the Web Part Page Maintenance page
- Select the web part of your interest and then click the appropriate funciton on the toolbar, such as Delete
Keep in mind that whatever changes you make on the Web Part Maintenance page will affect all users who have access to the actual page.
One last thing. There's a reason why I always recommend my customers to always rename their web parts immediately after they have added them to a page. And the reason being is the Web Part Page Maintenance page. Once you are in this page, there is no way to distinguish a web part from another one if they are all called Content Editor, Image Viewer, or Calendar. I don't know you, but I'm not a mind reader.
If you cannot distinguish one Content Editor Web Part from another one because your customer failed to rename them after adding them to a page, try to rename the other web parts that are not corrupted. This will help you narrow it down. If that's not an option, well, I'll leave it up to you on how to disclose the bad news to your customers that you may end up removing the wrong web part. Believe me, I've been there myself and once I removed the wrong web part (or all of them because there was no way for me to tell them apart from this page) my customers learned their lesson and never forgot to rename their web parts ever again.
When Microsoft upgraded SharePoint from MOSS 2007 to SharePoint 2010, some links that I personally used to find useful where "gone." Do you remember the All People link, or the other link we used to have to check storage space allocation on a given site? Those are the links I'm talking about.
Well, not all is lost. Some of that information is still out there. You just need to know the "backdoor" to them.
Here's a list of some of the links I miss from the previous version and their "backdoors."
Note: You need to be granted Site Collection Administration access in order to be able to use these "backdoors."
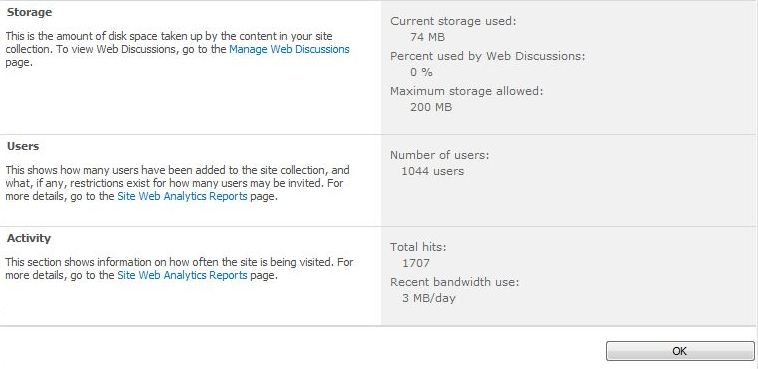
Checking Storage Space Allocation
At the top level of your site, remove anything that comes after the site root URL, append _layouts/usage.aspx, and press <Enter> on your keyboard. SharePoint will display the page below.
Viewing All People Who Have Access to a Site
At the top level of the site, remove anything that comes after the site root URL and append the following:
_layouts/people.aspx?MembershipGroupId=0&FilterField1=ContentType&FilterValue1=Person
Press <Enter>.
If you are a Site Collection Administrator for the site, you should be able to see a list of all the people who have access to the site. I really like this page because it allows me to remove people who no longer work with us and I don't have to go fishing for them, trying to find where it is that they might have been granted access to the site. With this option, I can remove them from the site completely in one single step.
|
 RSS Feed